Overview of the Amazon Lightsail Manage Options | Connect to Linux Guest OS
Before you begin with this tutorial first read the tutorial How to create an Amazon Lightsail Linux Instance. If you already covered that part then move forward to know the manage options in the Amazon Lightsail Instance and Learn how to connect to Lightsail Linux Guest OS.
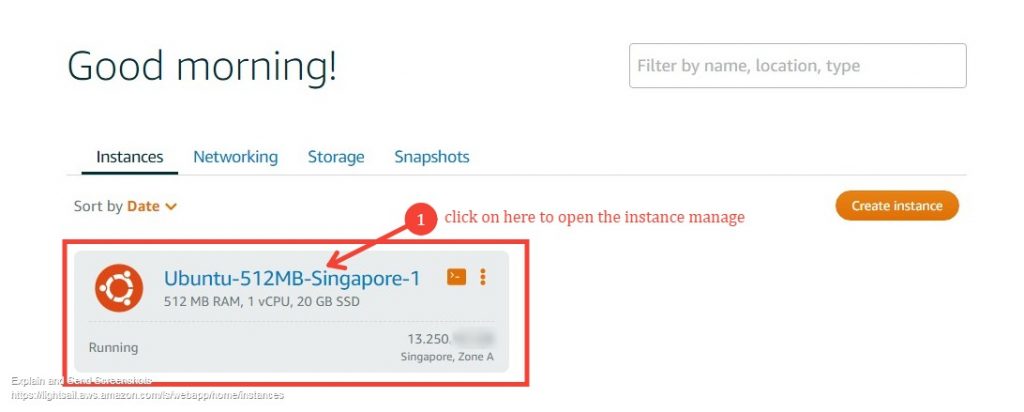
In Amazon Lightsail service page you can see the created instances. In my case I have only one instance that we have created earlier “Ubuntu-512MB-Singapore-1”. Please identify the numbered portions of the Amazon Lightsail instance.
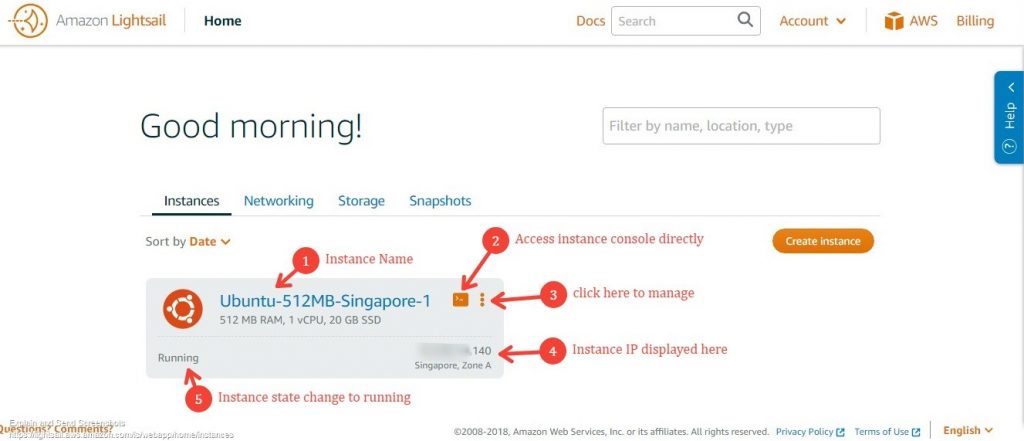
The description for the each No are as follows;
- You can see the name of the instance.
- You can access the Amazon Lightsail instance console directly clicking on the icon.
- You can access the Amazon Lightsail instance, manage options such as Connect, Manage, Stop, Restart, Delete clicking on the icon with 3 Orange Dots.
- The Amazon Lightsail instance Public IP displaying here.
- The Amazon Lightsail instance state as Pending/Running/Stop.
In order to manage the Amazon Lightsail instance, click on the Amazon Lightsail instance as shown below.
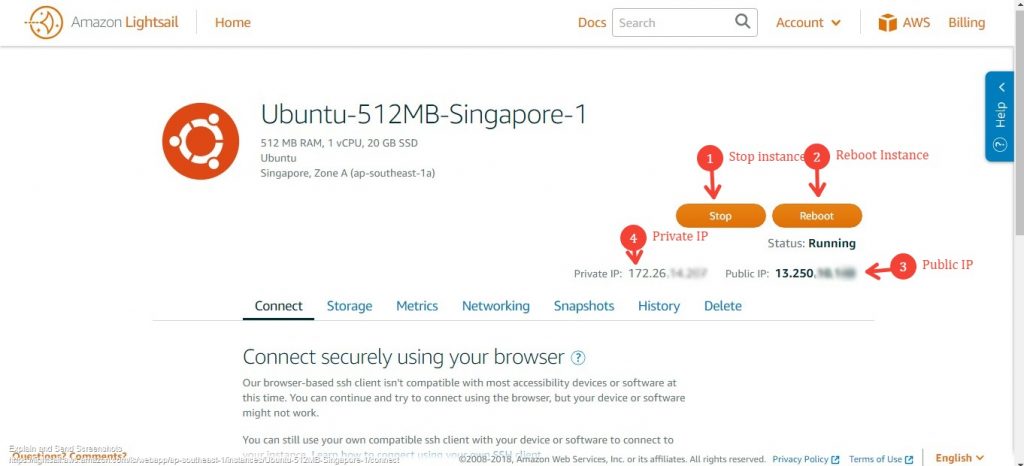
Manage options will be opened and there are 7 options available in the Amazon Lightsail instance to manage. Those are Connect, Storage, Metrics, Networking, Snapshots, History and Delete. This tutorial is writing to cover the Connect option only.
CONNECT to LINUX GUEST OS
Now let’s see how we can connect to the Amazon Lightsail instance to manage guest Operating System.
There are two ways that you can access the Amazon Lightsail instance either using GUI Direct Console from the AWS Lightsail instance or using SSH tools.
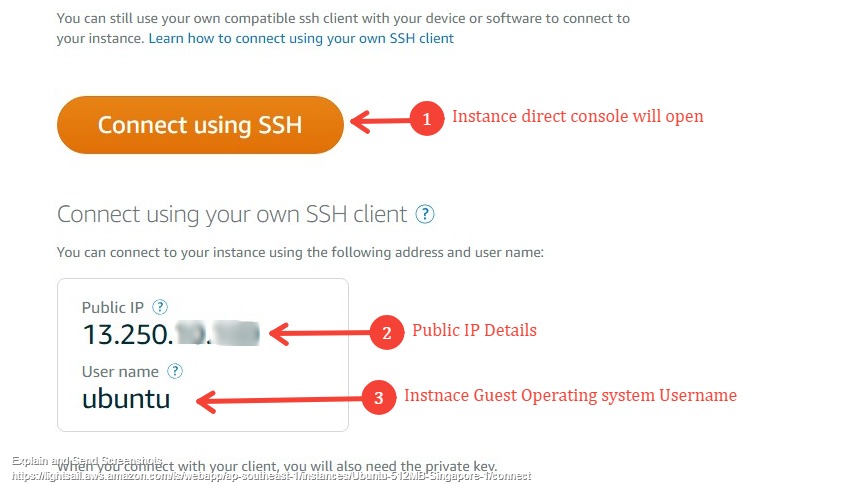
By clicking the “Connect using SSH” it will open the instance Direct Console from GUI.
Else you need an SSH client like Putty to access the server. Public IP address, username of the guest operating system user will also show here for that.
Note: You will also need the private key when you connect from Putty. Private Key can be downloaded from Account page. Read the tutorial How to create an Amazon Lightsail Linux Instance.
Now let’s see how we can connect to the Amazon Lightsail instance using Putty. (Click the link to download Putty)
Before you begin, first you need to generate your private key “ppk” file from default “pem” fileusing the Puttygen tool. (Click the link to download the Puttygen)

- Open Puttygen Click load.
- Browse to your LightsailDefaultPrivateKey-xx-xxxxxx-1.pem file downloaded to local computer and then open it.
- Select the Type of the key as RSA and the value should be 2048 for the number of bits.
- Click the Save Private Key button to save the ppk file.
Now open the Putty tool and go to Sessions and enter ubuntu@public-ip-address-of-the-instance as shown in the below. (Make sure that SSH Port 22 has allowed from the Amazon Lightsail Firewall)

Then Go to Connection > SSH > Auth and Browse to the location where saved ppk file and click open it as shown below.

Then click the Open button to connect to the AWS Lightsail instance through SSH. You will see the connected session.

That’s it. ?


